Creating an Event-Triggered Campaign
Follow these directions to create an event-triggered campaign:
From the main Connect screen, click the Campaigns tab. The campaign list screen appears.
Click the Commands > New Campaign. The Create New Campaign screen appears.
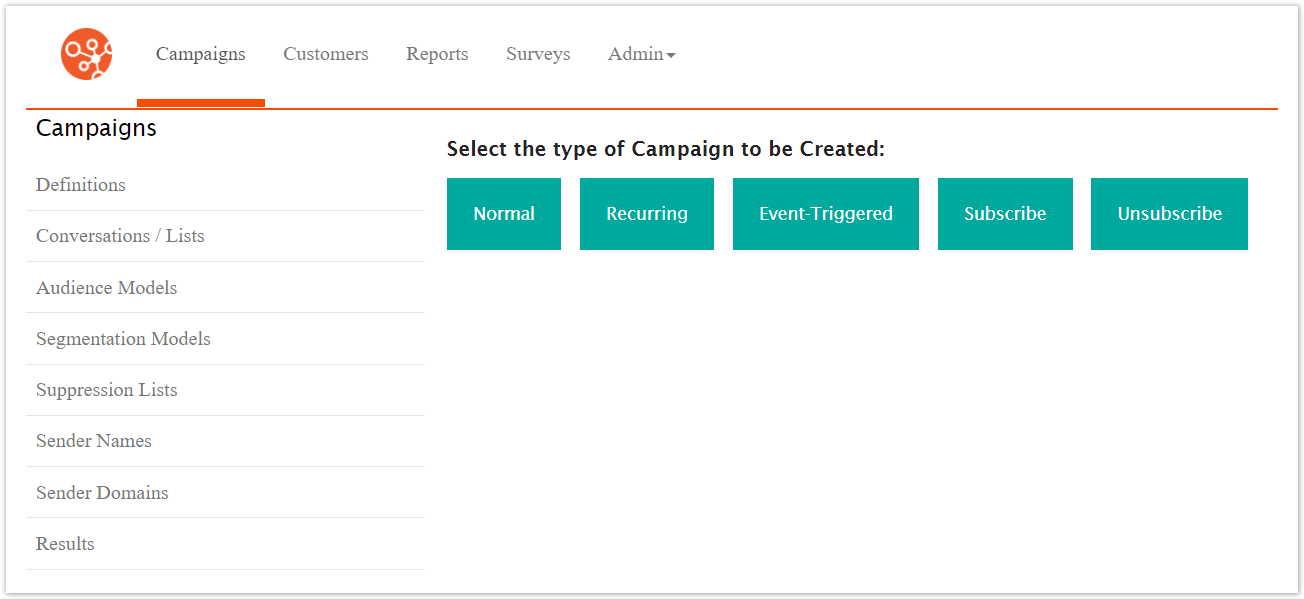
Click the Event-Triggered Campaign button. The Event-Triggered Campaign screen appears.

In the Configure Basic Info section, complete the following fields:
In the Name field, type a unique name for the campaign.
In the Description field, type a description of the campaign.
From the Department drop-down list, select the appropriate department.
In the Describe the Triggering Event section, complete the following fields:
In the Event Name field, type a unique name for the triggering event.
In the Event Description field, describe the event.
Click the Bounce Campaign? check box, if the event is triggered by a message bounce.

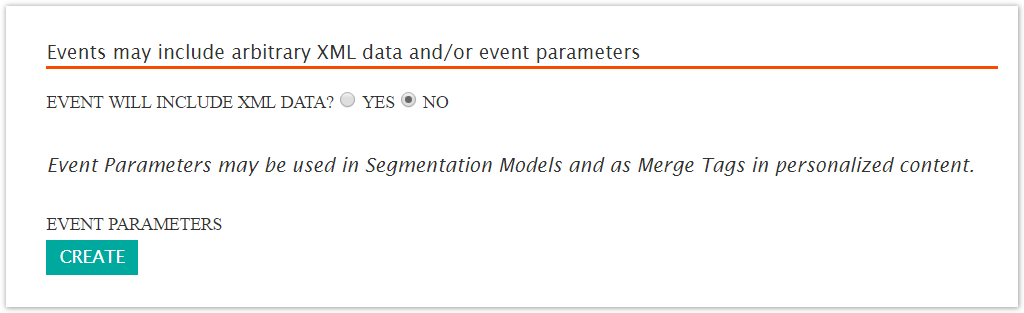
In the Events may include arbitrary XML data and/or event parameters section, do the following.
Click Yes if the event includes XML data or No if the even does not include XML data.
Note: If Yes is selected, Connect will refuse to accept events for this campaign that do not contain an external XML element.
To add Event Parameters, click the Create button. The screen expands so you can define one or more events. See Define Event Parameters below for more information.
In the Quiet Period section, define the type of quiet period to use.

In the Other Settings section, do the following:
Set the expiration date. See Set Expiration Date below.
From the Language drop-down list, select a language or keep the default.

Click the Save button. The campaign is saved and three more tabs appear. The new tabs are Targeting, Content, and Messages.
Define Event Parameters
Event parameters are defined in the Events may include arbitrary XML data and/or event parameters section. When you click the Create button, the screen expands to display more fields. Create as many parameters as you need. This procedure assumes you are in the appropriate location and ready to define parameters. Follow these directions to define event parameters.
By the Even Parameters label, click the Create button. The screen expands to display fields and buttons.

In the Parameter Name field, type a descriptive name for the new parameter.
Select the Parameter Type from the drop-down list. Options inclue the following:
Single Character
Number
String
Date
URL
In the Parameter Sample Value type a sample value for the new parameter
Click the Save button. A table appears with the new parameter.

Delete Event Parameter
Follow these directions to delete an event parameter.
In the Event Parmeter table, click the delete icon for the parameter you want to delete. A confirmation dialog box appears.

In the confirmation dialog box, click OK. The event parameter is removed from the table.
Set Expiration Date
You have two options for setting an expiration date, no expiration and define an expiration date. If an expiration date is set, Connect will not process messages for this campaign after the expiration date. This procedure assumes that you are in the Other Settings section and are ready to define a campaign expiration.
 Follow these directions to define a campaign with no expiration date.
In the Expiration Date section, click the Not Set link. The screen expands to display expiration options.

Click the Does not expire checkbox.
Click the Save button. The screen contracts and display the expiration.
Follow these directions to define a campaign with an expiration date.
In the Expiration Date section, click the link beside the Expiration Date field. The screen expands to display expiration options.
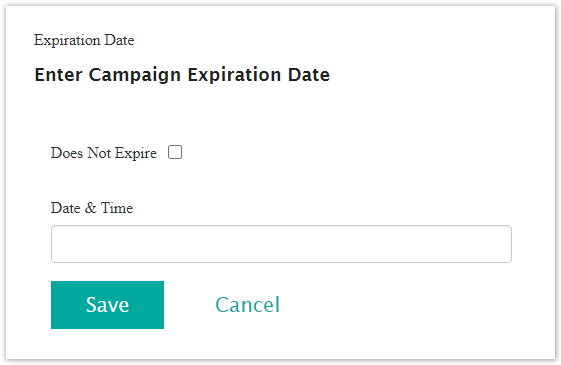
Note: Click the link even if it displays Does not expire. Click the Does not expire checkbox to remove the checkmark. When you remove the checkmark, the Date & Time field appears.
Click the Date & Time field. A calendar appears.
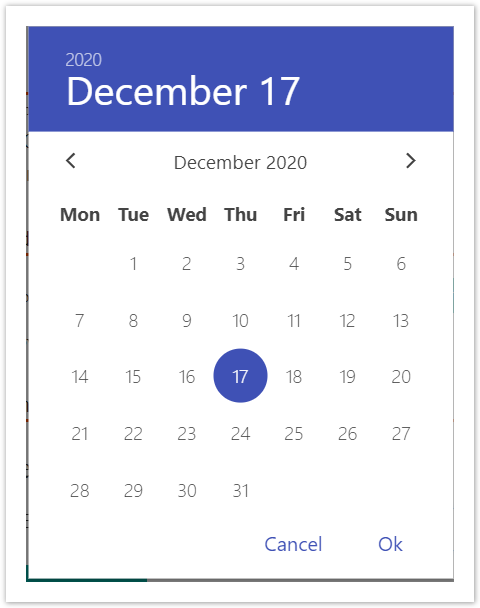
From the calendar, do the following:
In the calendar section, select a month and date.
Use the Hour, Minute, and Second sliders to define a time.
Click the Done button. The calendar disappears and the the Date & Time field is populated.
Click the Save button. The screen contracts to display the expiration date.
