Event-Triggered Campaigns - Message Tab - Message Actions
When you first open the Message tab, the left side of the screen displays all of the segments you defined and all of the content you defined. After defining your message, there are several actions you can perform such as:
Rollout Message

Stage Message
Launch Message

Before launching one or more messages, each message must be approved from the Rollout Message screen and you can test the message by selecting the Stage Message option. Stage Message sends the the message to internal customers for review.
Rollout Message
Follow these directions to rollout a message.
From the Segment - All Segments screen, click Action > Rollout Message on the row with the selected message. The Rollout Message: [Message Name] screen appears with a summary of information about the message.
In the Content Approval field, click Approve. Your name appears and the button name changes to Remove Approval.
In the Lanuch Approval field, click Approve. You name appears and the button name changes to Remove Approval.
In the Rollout Scheduling section, click the Effective Date link. The screen expands to display the Set the schedule for this Message fields. Do the following to set the schedule.
Click inside the Effective Date field, A calendar appears.
Select the month, day, and year you want to rollout the message.
Use the sliders below the calendar to select the time of day to rollout the message.
Click Done. The date and time appears in the field.
Click the Never Expires checkbox if the message does not expire. Leave the checkbox blank if you want to select an expiration date.
Click inside the Expiration Date field. A calendar appears.
Select the month, day, and year the message expires.
Use the sliders below below the calendar to select the time of day to rollout the message.
Click the Done button. The expiration date appears in the field.
From the Set the schedule for the Message section, click the Save button to save the dates. The date links appear beside the fields. If there is no expiration date, that information appears beside the field.
Note: If you click the Expiration Date link, the Set the schedule for this Message fields appear. Follow the sub-steps following step 4 to define the schedule.
In the Send Pre-Launch Notifiction section, do the following:
Click the check boxes for the groups who receive notification before launching the message.
In the note field, type a note to send with the pre-launch notiication.
Click Send Notification. The notification is sent.
In the Launch Message section, click Launch Message. The Segment Messaging screen appears and the message is rolled out.
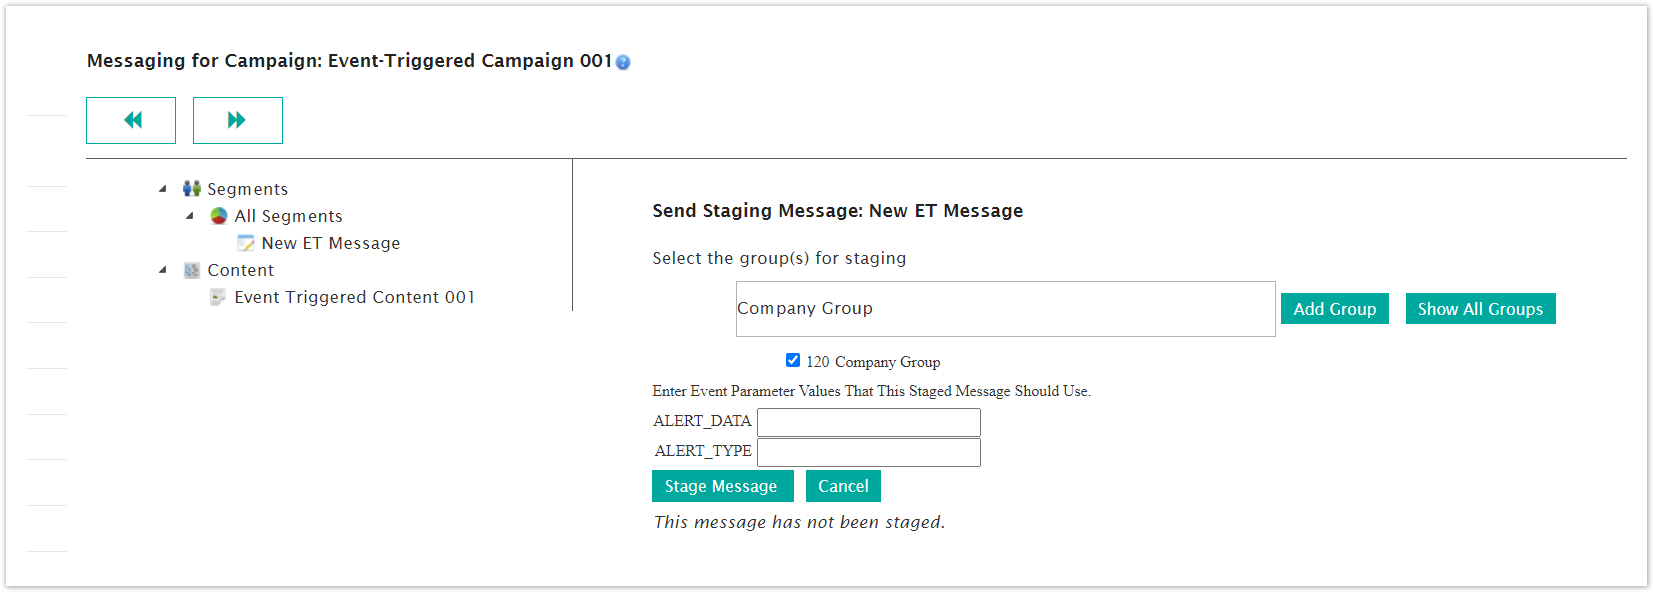
Stage Message
When you stage a message, you select internal groups who receive the message before rolling out to customers. If the message has event parameters, those parameters are listed and you can define the parameters from this screen.
Externally-triggered campaigns have XML content and that XML content is linked to the parameters.
Follow these directions to stage a message.
From the Segment Messaging screen, click Actions > Stage Message. The Send Staging Message: [Message Name].
In the Select group(s) for staging section, click the check boxes for all of the internal groups to receive the message.
In each parameter field, add the parameter values the staged message will use.
In the Enter XML Data field, add the XML content for the parameters.
Click Stage Message. The Segment Messaging screen appears and your message is staged.
Launch Message
Launching a message sends it out to customers. Before you launch the message, make sure you have refined it to get it just right for your audience. Follow these directions to launch a message.
From the Segment Messaging screen, click one or more check boxes beside the messages you want to launch.
Click Commands > Launch Messages. A confirmation dialog box appears.
Click OK. The message is launched.
Other Actions
Other options appear on the Actions menus in the Segment Messaging screen after you rollout or launch a message. New options include the following:
Pause - Suspends the message after launch.
Resume - Releases the message from suspension and continues with the launch.
Clone Message - Copy the message, rename it, and make changes.
Delete - Delete the message.